Red/Cyan 3D Glasses are needed to view some of the photos in this post.
I hope you all had a good holiday, and enjoyed a break from the routine. I took the end of December off, and now it somehow turned into a new year, so lets finally get something important out of the way. I knew it was only a matter of time before I would have to answer one of the greatest scientific mysteries, so lets start the decade on the right foot. This question has confounded all the great scientists, and now I shall conclusively answer it…you will all finally know the answer to the question “Is fire hot?”.
Armed only with my thermal camera, a paycheque worth of gasoline, and my well loved copy of ‘The Pyromaniac’s Cookbook’, I set out to
ERROR #42: The photography hardware used for this blog is out-of-date or obsolete.
Checking for updates…
Update found( 3D Camera (V4.0)). This update is mandatory. It cannot be delayed. Do you want to install this upgrade?
YES/YES
Please save all work. The update may erase unsaved data. It may also erase saved data. It may also erase vital system files. It may also cause your computer/smartphone/tablet/scrying glass to permanently stop functioning. This is normal.
Downloading Update- 0.0%
Do you want to view the 4.0 readme file while waiting? Doing so will give you a better user experience!
YES/NO
You selected ‘No’. Our algorithms decided you meant to click on Yes. Opening README:
Section 1: Developer notes
I’ve been thinking a while about writing a short history of my 3D cameras. Of course, that is much shorter than my history with 3D photography. I was into 3D well before I had a 3D camera. I never looked at any tutorials or lessons, but just kind of made my techniques up on the go. This is either me bragging about smart I am to figure it out, or trying to find an excuse for any bad 3D photos I’ve posted; I don’t know which.
Downloading…25% complete….Resuming README.TXT where you left off.
My parents had a Victorian-age stereoscope with a few cards; by viewing the cards, I figured out the principle behind it, and in 2007, made my first 3D images by playing around with different layers on software. To put break it down into the most basic explanation; you need two photos. One is intended for the left eye, and I will refer to it as ‘left photo’. The other is intended for the right eye, and I will refer to it as ‘not-left photo’. You don’t need two cameras, just one camera that can move position slightly. Most cameras can be moved, so it isn’t a big hurdle to overcome. The rest is just figuring out how to get each photo to be seen by the correct eye, and only the correct eye. So, in 2008, I tried my hand at making 3D images with my one camera. It went well, so I did more, and eventually it became a hobby/obsession. By 2010, I was regularly taking 3D photos with a single camera. There were problems with that, as quickly became apparent. Using a single camera worked for photographing a still object in 3D, but not a moving one. Moving objects would appear in different positions in the left and right images, and wouldn’t line up when the photos were combined. And, as I took more photos, I realized that there were a lot more moving objects that I’d thought of. Clouds, water, plants blowing on cloudy days, etc. This was before 3D became a big thing again, and dedicated 3D cameras weren’t cheap. no, If I wanted to get reliable 3D photos on a budget, I needed to make something myself. I needed a second camera.
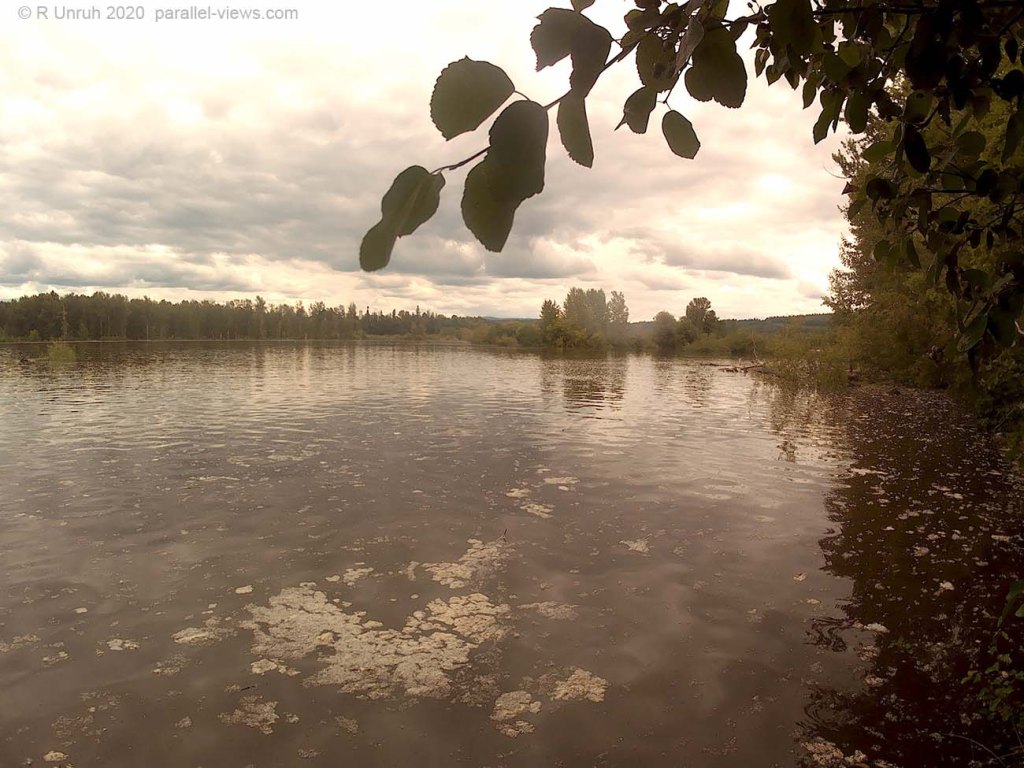
Standout 3D photo
Download complete. Preparing to upgrade camera hardware. Resuming README.TXT where you left off.
Section 2.0: Camera Revision History
Camera(V1.0) Operating life: 2011-2012. Code name: ‘Prototype’.
Base camera Model: 2x Centrios 2516108 5.0 megapixel cameras.

I’m ignoring my Nintendo 3DS’s when I’m talking about my cameras, because they’re great for showing 3D photos, but not so good at taking them. I mean, they could be worse…I don’t know how… but I never planned on using the cameras. I don’t use them as cameras. I DON’T USE THEM AS CAMERAS! I’M A BETTER PHOTOGRAPHER THAN THAT! I don’t know why I’m writing this here, as my first 3D camera was built well before I had a 3DS. I was wavering on whether I wanted to spend money on trying to make my own with no instructions or skills. I decided that I could afford it with my budget if I kept it very basic, so I went for the basics. And they were cheap…surprisingly so. A camera for less than $50? I’ll take two! And they were in clamshell packaging, a sure sign of quality!Why put a camera in a ‘box’? Is that to hide the device from critical eyes? Clamshell packaging proudly displays the camera for all to see!
The cameras were top-of-the line Centrios cameras. If you haven’t heard of Centrios, don’t feel bad; they’re just an up and coming brand that is way too exclusive for for you. These cameras fit my criteria of ‘very basic’. They didn’t have all the frills of those newfangled cameras. I got 5 megapixels and was lucky to have them, and a few of them even gave the correct colour!
As shown in the photo above, the setup was fairly basic. a piece of wood with two holes drilled into it, each the right size for a quarter-inch, 20 thread screw. It was great! I had wanted a piece of wood with screw holes stuck into it for all my life, and now I had one! But by a complete coincidence, that is also the exact size of a tripod screw. This meant that my Screwwood(trademark pending) could even have cameras mounted to it!
I chose plastic screws to mount the cameras; less durable, but I figured they’d also be easier to cut to size and less likely to damage the cameras. After fiddling aro;und with screwdrivers, I also glued wingnuts to the screws so I could adjust them by hand. The original design didn’t have that ridge in front; As I used it, the cameras would rotate slightly as the screws became slightly loose. As I didn’t want to screw the cameras to the mount too tightly, in case I put too much force onto them, they came loos often. To get the best 3D photos, both cameras had to be pointed in the right direction. The ridge was an addition to keep them from shifting angle, and it worked fine. It really was a case of trial an error; there were other little things I changed here and there, but most of those aren’t worth mentioning.
Enough about the mount. It’s a stupid piece of wood with screws stuck into it. I’m bored talkign about it. What about the cameras themselves? Is there any point to reviewing obsolete electronics that probably no one can buy anymore? Maybe not, but it sounds fun to do anyways.
First off, There was no optical zoom. I do not speak of Digital Zoom, and shall not speak of it on this website. It is a cursed thing, and unworthy of my attention. Let it be said that the digital zoom was worse than cropping and resizing on the computer, and there was no way to disable it.
The plastic, although pleasingly red, was very flimsy. There was no viewfinder, and the viewscreen was washed out and sluggish. The photos were…okay… if the light was bright, there wasn’t much movement, and there wasn’t too much contrast between light and dark. They didn’t have great focus, and looking at them now with some more experience behind me, I might have an idea why. It seems like the lens was only a millimetre across, so I think it may have been relying a lot on the ‘pinhole camera’ effect to get objects into focus. This could explain why they didn’t have a macro setting that I could find. It would also explain the poor quality in low light: it’s a small hole, so not much light gets through.
The biggest problem with these cameras, however, was the button response time. With most of my cameras, I can point them at an object I want to photograph and hold down the shutter button half-way; the cameras will get interpret that as a signal to focus and calculate the ideal settings for the photo. When I click the button rest of the way down, they would then already have the scene analyzed and have calculated how to take the best photo, and preset the lens to have the desired subject in focus. They will then quickly take the photo. When I’m trying to get two photos taken a the same time, I need ‘quickly’.
‘Prototype’ did not have this. The button could be pressed, or not pressed; there was no half-press. When I pressed the button, it would analyze the scene, eventually decide that this might need specific settings, go off and have a digital equivalent of coffee to celebrate a job well done, belatedly realize it hadn’t finished the job for me and had to actually calculate the settings, desperately scribble them on a piece of digital toilet paper, pass them on, and eventually take a picture that was always too dark and slightly out of focus. Often it took over a 1/2 of a second from button press to photo, and sometimes up to a second; the left camera was always slightly faster than the right one(yes, they had the same SD card type and battery), and I couldn’t get a quick motion picture with them. I’d estimate that the left camera responded about a quarter-second faster than the right one, so I would have to time it and start pressing the left button slightly faster than the right one. That never worked, but it didn’t work in a slightly better way than pressing the buttons simultaneously didn’t work.
I choose to call this camera rig ‘Prototype’ because it proved my 3D camera concept was sound, even if the cameras themselves weren’t. Yes, I called it ‘Prototype’ retroactively, but ‘I used basic materials to demonstrate my proof-of-concept’ sounds much better than ‘I think I wasted my money, but I could do it better next time.’
I learned an important lesson, however, one that has stuck with me to this very day; Don’t skimp on the price; you’ll just end up with a slightly less expensive object that doesn’t work.
Bye-bye 1.0. You taught me a lot, like why I shouldn’t have bought you.
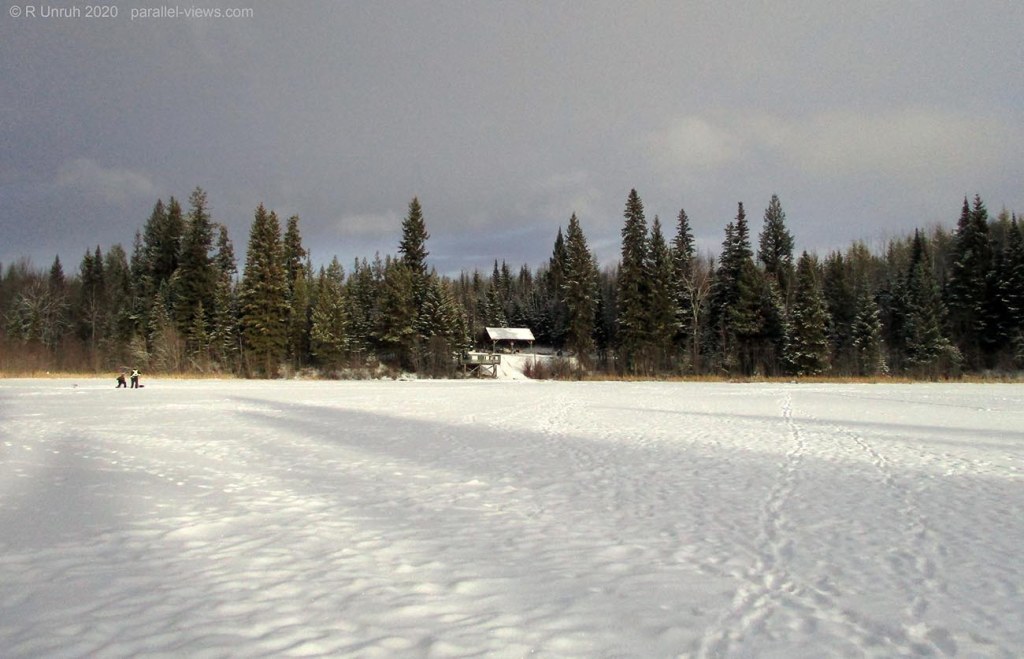
Standout 3D Photo
Pros: Proved my concept sound. Red. Lightweight.
Cons: low quality images, bad in low light, no zoom, grainy photo, slow response, no way to focus the camera without taking a shot.
Installing: 18% complete…Resuming README.TXT where you left off.
Camera (V2.0) Operating life 2012-2013- Code name: ‘Makeshift’
Base Camera Model: 2x Samsung ES25 cameras

‘Prototype’ didn’t last too long. By spring, I had already been thinking of replacing it, and circumstances lined up so that I did it quicker than expected; my second attempt at a 3D camera was almost accidental. On a trip to Alberta, I was having issues with my one camera(yes, in those day, I only brought one camera on my vacations, like an ANIMAL!). The lens started to have issues. Digital cameras aren’t supposed to make grinding noises, are they?[camera kill count: 1] With a limited budget, I bought a low-end point and click that was on sale. Testing it out, it seemed fairly decent, and it was in an actual box, not clamshell packaging. I ended up replacing my ‘good’ camera, of course, with another, better, camera after this trip, but had this one as a backup. As such, I decided to improve my 3D rig, and bought a matching camera.
My 3D mount itself underwent very few revisions; instead of a ridge in front to keep the cameras aligned, I carved a groove into the wood. I also painted it; I thought it would look better and protect the mount.
They were basic point-and-shoot cameras, with 4x optical zoom. The photo quality wasn’t exceptional, but decent, and they were fairly responsive in good lighting. I really don’t have much bad to say about them. Basic, but reliable. They often did seem to chose different colour settings, even if they were looking at the same object. For 3D, I usually had to switch off the automatic colour balancing, instead giving them both one setting(no custom settings, so I usually used the cloudy setting by default, and changed it as needed). Otherwise the colours were off between cameras, making the photos look slightly different. It wasn’t a deal breaker, and If I forgot to set the balancing I could usually minimize the difference in post processing, but I prefer to get the original photo right.
Take it easy, 2.0. You’ll be there if I need you…but I won’t need you.
Standout 3D Photo

Pros: responsive, good photos, decent resolution.
Cons: poor in low lighting, few manual controls
Installing: 36% complete…Resuming README.TXT where you left off.
Camera(v2.1)- Operating life:2013-2018- Code name:’Caveat Emptor’
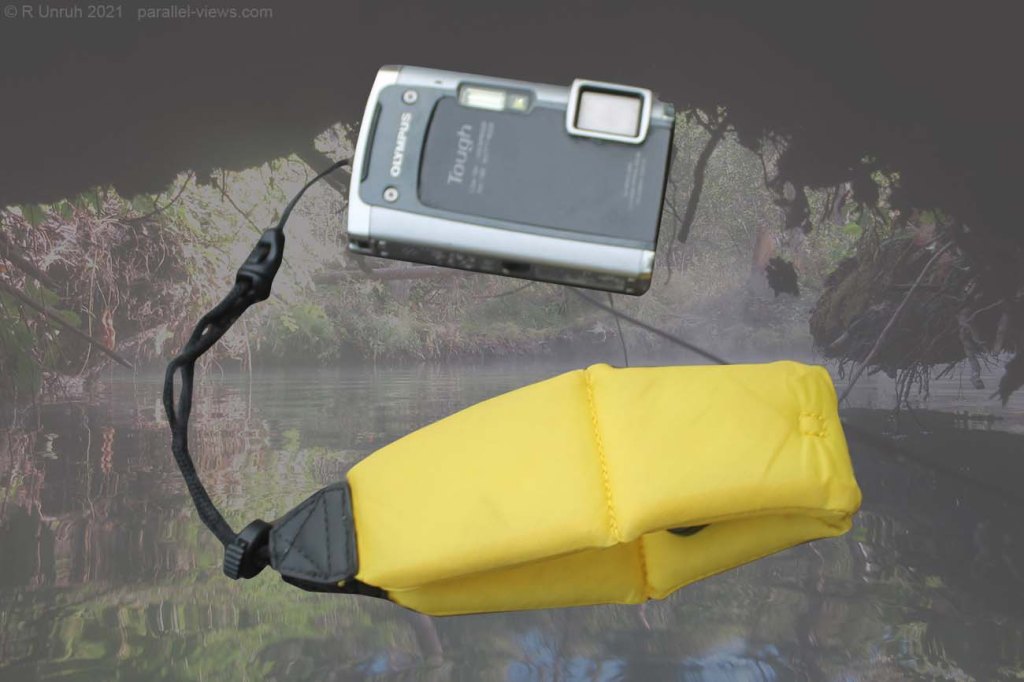
Base camera Model: 1x Olympus tough TG-610
About that…
I was happy with ‘Makeshift’, but I was looking to replace my regular old waterproof camera. It stopped being waterproof in New Mexico[camera kill count: 2], and shortly after that, it stopped being a camera. I was disappointed, but… do you know how hard it is to find water in New Mexico? I’m almost proud of breaking it that way! I wanted another waterproof camera, not a 3D camera; I wasn’t even thinking of underwater 3D at the time. Even if I was, I was liking the versatility of having two cameras that I could use independently. However, saw a sale for the Olympus Tough camera, and it said on the box that it took 3D photos! A waterproof, shockproof, stupidity proof, 3D camera was well worth a look. By ‘look’, I mean ‘immediate purchase’.
Well, there was a problem, as hinted at by the code name. I gave this camera the code name ‘Caveat Emptor’. For those with a classical education, Caveat Emptor is an ancient Latin term for ‘did you count the lenses on the camera?’ See, it wasn’t a 3D camera, as it turned out, but rather a ‘3D’ camera. One lens.
One.
Lens.
@%($*@@$&ING ONE LENS! THAT MEANS ONE PICTURE!
The ‘3D’ advertised on the box was software, not hardware. When 3D was selected, a specific overlay would appear on the screen showing the previous photo; that would allow the photographer to take a photo, have the photo appear on the display screen, then help him/her match up the image when taking a photo taken from a slightly different angle. It would then output the two images a a single 3D file.
For those keeping track, I had been doing the exact same thing for five years. I had done it manually, but after trying the ‘3D’, I have to say that I did it better. No motion 3D Photos, slow software, awkward controls… ONE LENS!
Also, it wasn’t stupidity-proof, only stupidity-resistant. That’s eventually what killed that camera.
Also also, the color balance was slightly off; the images often looked more reddish than in real life.
Also also also, it was heavy…no, that isn’t the right word… it was dense. Much denser than water. It would sink quickly when released. As it was black and silver, when it sank in murkier or deeper water, the silver would look grey, and it would be very hard to find. MAKE YOUR CAMERA BRIGHTER! I hope that Olympus will take this criticism to heart when they release their next camera. That was easy to fix; I found a floating wrist strap at that up-and-coming Canadian retail giant, Target! I even bought it during the grand opening! The wrist strap was buoyant enough to keep the camera afloat, and bright enough that it would be easy to see if I lost my grip. I actually let it loose to float on it own in the lake a lot, as there was a maximum depth the camera was supposed to reach, and I often dove deeper to see if I could touch bottom. Besides, I hear free range cameras are much happier than ones kept in captivity.
But also, ONE LENS!
With all the negatives of the camera out of the way, I have to say, I used that thing a lot. It wasn’t a good 3D camera, and really, maybe not a great camera, but it was a good camera for withstanding punishment. It was submerged, dropped, stepped on… eventually I learned that I could skip all that and just take a photo more easily by pressing the button; live and learn! The camera went with me around North America; it went under waterfalls, down cliffs, through caves, and into two oceans. I thought I killed it in the Mackenzie River when a pebble jammed the lens cover, and ended up buying fishhooks in Dawson city to dig the pebble out. I thought I killed it in southern BC, when it bumped a rock underwater and the battery compartment lock came undone; it killed the camera for the next week, but it came back to life when I dried it out. I thought I killed it in Northern BC, the night after swimming in the hotsprings when the air dropped below freezing; the water on the camera had turned into a solid layer of ice, but once defrosting, it worked as well as ever. I thought I killed it in Haida Gwaii, when I screwed it onto a tripod, but didn’t notice the tripod screw was warped. I heard a crack, tried to take a picture, and got this…

and it never did anything else.
Okay, admittedly, that last death took. [camera kill count: 3]. RIP 2.1. You lived a good life, but sucked at 3D.
Standout 3D Photo


Pros: Durable.
Cons: Bad colour settings, ONE LENS.
Installing: 54% complete…Resuming README.TXT where you left off.
Camera V3.0. Operating life-2014-2020 Code name: ‘Workhorse’.
Base camera model: 2x Canon SX600HS cameras

‘Makeshift’ was still working for me(and in fact is still working; it’s the camera I loan to others when I want 3D photos of their trips), but I was starting to develop a better sense of what I wanted in a 3D camera. The concept and camera rig was sound, and the cameras worked well, but they were still basic, low end cameras. They didn’t have great manual settings, so it was hard to match the white balance for the two cameras, and they weren’t great in the dark. The flash wasn’t awful, but it wasn’t the best, and the shutters wouldn’t stay open for longer periods of time, so no night photos without a flash. Image stabilization? The closest to that was putting them on a table to keep them still.
The biggest reason for the upgrade is that I was using them as a regular camera as often as a 3D camera. I still had a main camera, but had decided to replace it for various reasons that I won’t get into [camera kill count: 4]. The replacement was a DSLR, much more powerful than a basic point and click. I also starting getting involved with full spectrum photography; If I had to quickly snap a photo, I had better hope that I had the right lens for the DSLR or the right filter for my full spectrum camera. Or skip all that, and just use half of my 3D cameras, which were, of course, two normal cameras side-by side. And If I was doing that, why not get something that would also be a powerful 2D camera? Enter ‘Workhorse’. Dual Canon SX600 HS cameras. Light and compact, but fairly powerful for its size. 18x optical zoom, decent in low light, responsive, and good manual settings. In all, decent mid-range point and shoot cameras. The zoom isn’t usually used with my 3D photos, as it is hard to get both cameras to zoom in the same amount, but it is invaluable for normal photos.
Again, the same design as above; I switched the ridge to the back of the cameras, as they were the wrong shape for it to be on the front. I also ditched the paint; it has started to flake off 2.0 and stick to the cameras(and stick inside the tripod mount). Back to plain old unvarnished wood.
These cameras have been with me for the last half-decade. They’ve been through Canada(nine provinces, two territories), USA(twenty-two states), Ireland, The United Kingdom(wait… is that one country or four? Either way, I went to all of it), India, and who could forget my deep and insightful expedition into China? I’ve been happy with them, and they’ve seen more of the world than a lot of people… but they’re showing their age.
Now, I’ve been going through the negatives of each camera here, and I think the biggest issue with these cameras is the lens cover. It is one of those point-and-shoot retractable lens covers, and now that I’ve used these cameras for six years, they often stick when opening.
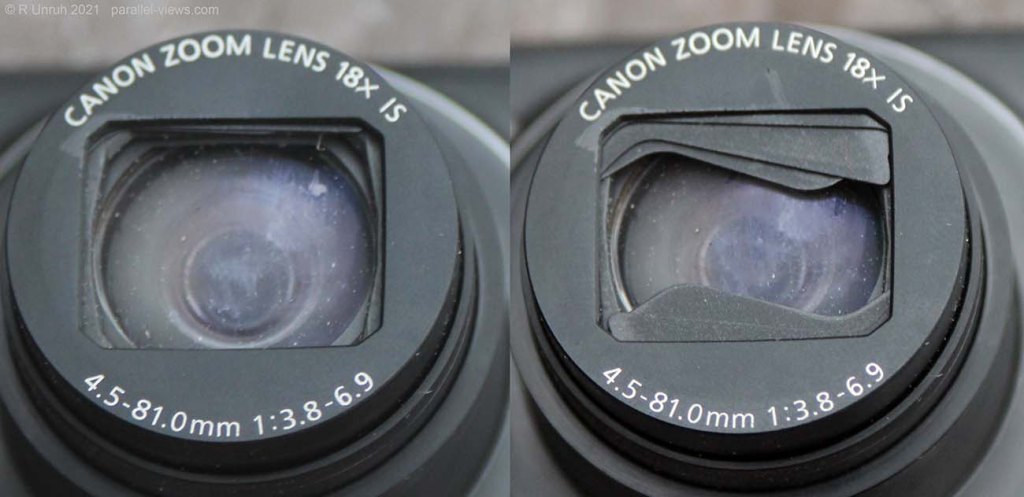
I’ve tried cleaning them with compressed air, but no luck; I think I would have to open them up to clean them properly. I think this is an overall issue with this model of camera; I had to return one of the cameras within the 30 day return policy, as the cover was sticking out of the box [camera kill count: 5]. I’m expecting that the camera kill count will be going up again if the problems get worse, but not yet. Other problems: There is a bit of lens distortion on the edges of the photos, so they need to be cropped sometimes to get a better 3D effect. The flash works fine, but works slow. The flash bulb is retracted and pops out when needed. Once the flash pops out, it will be about 5 seconds before I can take a photo. I assume the light needs a larger electrical charge, and to save power it doesn’t charge up until the bulb is out. I’ve missed a few wildlife photos in dusk due to that, but overall it hasn’t been a problem. Like I said, I’m pretty happy with these cameras, and they’ve more than met their expectations.
Standout 3D Photo

See ya later, 3.0. I’m sure I’ll still be using you for a while, but you’re now semi-retired.
Pros: Good zoom, good image stabilizing, good manual settings.
Cons: Lens cover is prone to sticking, some image distortion in the corners.
Installing: 72% complete…Resuming README.TXT where you left off.
Camera(v3.1) Operating Life: 2018-2018 Base model: Code name: ‘Pieces of $#!?’
Base camera Model: 2x Polaroid iS048

My first waterproof 3D camera was a bust, due to ONE LENS, but I hadn’t given up. It wouldn’t have to be my main 3D camera; it just needed to be able to survive situations that would kill my other camera. Namely, immersion in various liquids. As implied my the model number I’m giving ‘Pieces of $#!?’, I considered v3.1 as a supplementary camera to my main one. This time, I would do it right. This time, I would buy two cameras. This time… I really need to get it done quickly, didn’t I? After all, I was planning a trip to Haida Gwaii, so I had a time limit. I had to find cameras, and build a mount for them, in less than three months. And I found them! I saw a deal on waterproof cameras; surprisingly cheap, not only waterproof but shockproof, and built by a reliable company. Polaroid is a reputable name in cameras, isn’t it? It’s not like Centrios. Polaroid is a solid name with some history behind it. I mean, it’s not like someone could just attach a reputable name of a long-dead brand to dollar-store quality cameras, could they? Isn’t that against the law or something?
…
…
oh.
oh no.
yeeahhh… you might be guessing where I’m going with this. But bear with me; before I get into the cameras, lets talk about the 3D mount design. It’s still the same basic design. The biggest change to the v3.1 3D rig was in materials. I had a feeling that a wooden frame, while useful in most cases, might not be ideal for use underwater. Instead, I looked for the highest quality custom molded plastics, saw the price, instead looked at 3D printers, saw the price, and eventually bought a dollar-store plastic cutting board instead. I added my pretty yellow floating wristband(originally used for ‘Caveat Emptor’) to give the cameras buoyancy, attaching it to the lanyard hole for the right camera. And now we get into it. How were the cameras themselves? Well, they let me know what to expect right from the beginning… so that’s good, at least?
But you may ask, how did they let me know? My first problem occurred about ten seconds after I turned it on. Actually, it occurred a second after I turned it on, but it took me nine seconds to notice the problem. This next part is not a joke. I want to emphasize this. I am serious, and that makes it even more ridiculous. With the first startup, the menu displayed on the camera screen requested me to conduct the initial camera setup. To do this, it prompted me to press specific buttons on the camera to set the time and camera functions. Two of these buttons did not exist on my camera. Setting the time was literally the first thing the camera did after being turned on, and it didn’t work. How could anyone miss that? Did the quality testers not understand the whole ‘buttons must exist’ requirement for buttons? That last sentence is a joke, of course; obviously there were no quality testers. My best guess is that Polaroid reused firmware from another, better, model of camera. I’m assuming it is better because it had two more buttons, and also because it was not these cameras.
The shutters were marginally more responsive than in ‘prototype’, but still would be off for around 1/3 of second, maybe more in dim light. Fast action photos were probably out, but slower movement should be okay. Bright vibrant photos were out too; The colours were washed out, but I could fix it in post-processing. they were okay at focusing, but really, not great. No manual settings. Finally, the photos were atrocious in dim lighting; as ‘underwater’ could often be described as ‘dim’, I was a little concerned. As it turned out, I didn’t have to worry about that. There was no zoom(again, I shall not speak of digital zoom, except to say this was bad even for digital zoom), but that was expected with an underwater camera. I mean, it was an underwater, shockproof camera at a good price. A really good price.
‘Shockproof’ didn’t mean that the cameras were built extra tough. Holding them and feeling the plastic made it very obvious that they weren’t built extra tough. Instead, it meant that there was a rubber cover you could fit over the camera. Did the cover work? It wouldn’t work when used with my 3D mount, as it covered the tripod holes in the camera. As a result, I never tested it, but given the build quality of the rest of the camera… at a guess, it probably would have caught fire, broken, and given me lead poisoning the first time I bumped it. And insulted me while doing so.
Because oh yeah. One more small issue. Perhaps not even an issue, but just a slight linguistic disparity. Specifically, a difference of definition on the word ‘waterproof’. I had foolishly assumed ‘waterproof’ meant ‘This camera can be immersed in water safely’, whereas for Polaroid, ‘waterproof’ apparently meant ‘immersing this camera in water will provide proof that our cameras aren’t supposed to be wet’. The left camera died the second time it was immersed, and the first time was a five minute test of the waterproofing in the kitchen sink, so this was the first immersion in real-world conditions [camera kill count: 6]. The right camera was wet inside the battery compartment, but survived[camera kill count: still 6, but barely]. This was also the trip where ‘Caveat Emptor’ died, so I used the remaining camera sparingly for the remainder of the trip. It survived subsequent brief dunkings but the battery compartment was always damp afterwords, with water droplets on the battery, and the hinges and a battery terminal were starting to rust by the end. I’ve since given the camera to a friend who lives on the coast, in the vain hope that it might at least withstand a little rain.
To sum up: The cameras were a complete failure. One died on the first swim, and the other barely survived it and subsequent other swims, and was only used because I didn’t care about killing it. I never even got a 3D picture out of it.
I learned an important lesson, however, one that has stuck with me to this very day; don’t skimp on the price; you’ll just end up with a slightly less expensive object that doesn’t work properly.
Goodbye, 3.1. I’ll always remember how you bumped my camera kill count up slightly.
Standout 3D Photo

Pros: ????
Cons: Very liberal definition of ‘waterproof’, poor quality images, the software needs mystery buttons. Really, the first one is the only one you need to remember.
Installing: 90% complete…Resuming README.TXT where you left off.
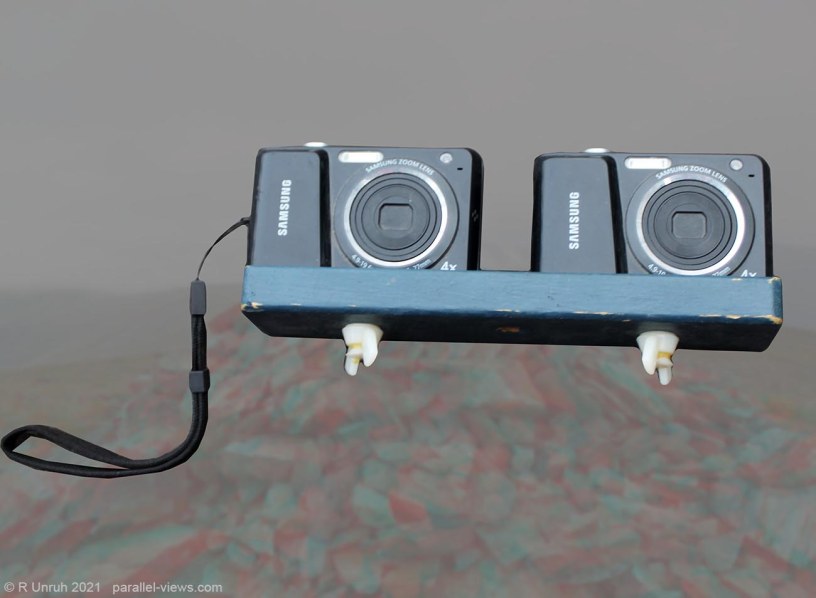
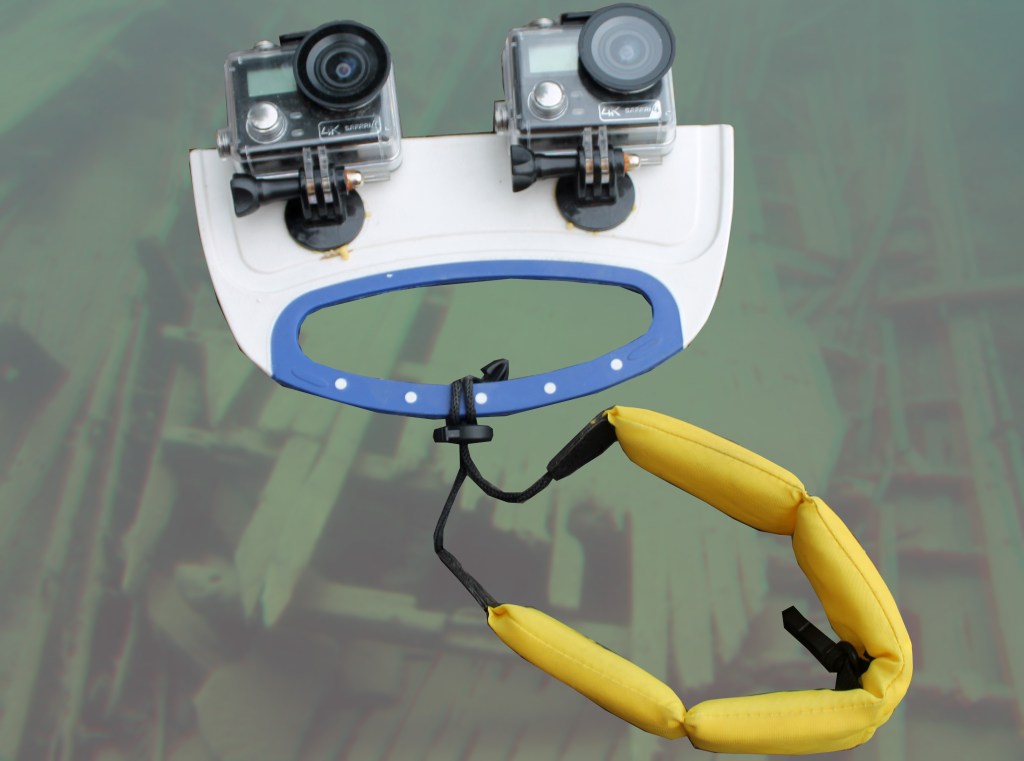
Camera v 3.2 Operating Life: 2019-present Code name: ‘Old Dunky!’
Base Camera Model: 2x Safari 4 4k cameras inside waterproof housing.
After ‘Pieces of $#!?’ came to the end of their mercifully brief working life, I still wanted to take some underwater 3D photos. This time, I decided to prioritize the ‘underwater’ part of the camera. I wouldn’t really need a camera to replace my everyday camera, so why not an action cam? They’re supposed to be fairly durable. I don’t need zoom underwater, as visibility isn’t usually as good as air and zoom is tricky to use with 3D at the best of times(and being unable to breathe when taking a photo is not the best of times). Looking into the prices, a GoPro was clearly out of my budget, but there were a number of cheaper makes and models. ‘Safari’ sounded like an exciting model, one that would fit into my life of adventure. I was judging that solely by the name; As I think I’ve proved with other cameras, a life of adventure doesn’t leave time for looking at specifications or reviews.
I decided on buying two of these cameras on a sale. They were a surprisingly good price. For the mount for these cameras, I still had half of my plastic cutting board left and my ‘almost unused’ 3.1 mount, but I had noticed some flaws with my v3.1 design(meaning I can refer to ‘pieces of $#!?’ as a prototype as well), so redesigned it. In this case, it was a major redesign, the largest since my first setup.
The cameras didn’t have their own tripod attachments, instead needing connections between their protective housing and their included attachments; these other attachments were round at their base, so a ridge behind them wouldn’t prevent the cameras from swiveling around. Obviously, the backing should go; why include it if it isn’t going to be any good (that’s the reason why nobody invites me to dinners). Instead, I glued and bolted two of the case attachments directly to the board. These attachments still allow for the cameras to pivot up and down, which isn’t ideal, but I couldn’t find any easy alternative. If the cameras were to be ‘upright’ on the hinge, I would have to double-check their angles every time…underwater…in the dark… while holding my breath…I see problems… I didn’t want that, so I changed the intended angle as well. If the cameras are angled back the maximum amount, so that they are against the cutting board, they are both in the correct position.
Another reason for a redesign is that I found my ‘landlubber’ style camera rig didn’t translate to underwater photography very well. The 3.1 setup was awkward to hold while actively swimming; I couldn’t just let it dangle off my wrist, as it would severely inhibit my swimming, and if I held onto it, the only good place to grip onto was one of the cameras. I often would accidentally turn the camera on and take photos of my blurry hand, and also put more force on the camera than recommended(note: this doesn’t apply to the weaker half of ‘pieces of $%!&’, as the camera died within a minute of going in the water while I was still walking waist-deep). Worst case scenario, holding the camera like that might result in the watertight seal being opened. Instead, I incorporated the cutting board handle into the new design, making it into a camera handle. The wristband is now connected to the handle instead of the cameras, both to reduce the force on the cameras, and because there is no way to attach them. Yes, I reused my faded yellow floating strap, and that strap has now outlived two cameras, the manufacturer of the first camera it was attached to, and the company that sold it to me.
So, how is it? Well, first, the positives: the clear protective case for the camera is durable, and it IS waterproof(I kept them in the sink for an hour to test them, then went swimming with them the next week while they could still be returned). It does okay in lower light underwater, and photos aren’t blurry if I can keep the camera fairly still.
However, the camera accessories don’t fare as well in my review; the ones I used are starting to rust after being used, despite being rinsed and dried after each swim. I have done more than my usual amount of swimming in salt water(which, for the records, is ‘none’), so that didn’t help, but still, 70% of the world is salt water, and according to legend some people live close to salt water, so maybe the makers should account for that. It hasn’t affected the waterproofing after a year, and is mostly cosmetic, but still, I expected some kind of corrosion-resistant metal.

The photos are supposed to be 4K high resolution, but I think there must be some digital upscaling involved, as they look weird when zoomed in on the computer. Even at 50% zoom, the photos look very grainy and kind of… ripply, I guess? is that a word? My spellcheck says it is. The color balance is also off:very dull, brownish, and faded, even to the point that I can’t fully correct it on the computer. I thought this might just be for photos, but it happens with video recording too.


The buttons aren’t great, but they are responsive enough that I can take 3D action photos(especially useful underwater, when I’m probably moving as well). However, they are hard to press through the protective case, so quick shots are out, and I usually end up taking multiple sets of photos. There aren’t any settings for quickly taking a batch of photos(the ‘burst’ or ‘continuous’ option I can use in some of my other cameras), and it’s about 3 seconds between taking one photo and another. I need to think the process through: what angle should I be at, is there enough light, and can I hold position long enough to take two photos? However, in many cases the questions boil down to ‘can I hold my breath long enough?’; I can usually take two or three attempts at 3D photos in one breath, and probably at least one of them will be a dud. It probably isn’t an issue with video; press the button before you start, and it will be recording. It really wouldn’t be a big problem for single-camera photography either; it is just trying to take two photos simultaneously is a lot harder when the buttons need a lot of pressure.
The battery life is poor… and worse than that, it’s poor in an unreliable way. When turned on, both cameras will drain their respective batteries in less than two hours, and the batteries are internal, so there’s no way to swap them out. I’m not too surprised about the battery life, as they are small and use a lot of power to keep the LED viewscreen on when recording video or taking photos. Even without much experience with action-cams, I think they’re still subpar in battery life to a higher-end action-camera, but that really isn’t the issue. The issue is when they’re turned off. One camera will keep a charge for a couple months when turned off, and the other will be drained inside three days. They’re supposed to be identical models, so I have no idea why one battery drains so fast when the camera isn’t operating, and the other is fine. On my 2019 roadtrip, I was thankful that I had a way of charging them when driving, as the camera would be dead by the time I arrived at a swimming destination. In fact, it often was dead by the time I arrived, as I often find swimming holes in unexpected places and missed a few photos because of it. An extended multi-day hike or something away from a charger? I doubt I’d even bother taking these cameras. Luckily, I had enough experience with them by the time I got to the places where I really wanted to use them, so I could plan the charging schedule accordingly.
To sum up: They’re acceptable, but barely. There is no zoom, and the buttons are hard to press. The cameras are obviously designed for video, and not still photos, and every time I turn them on, I have to remind them to take pictures, not videos. Colour grading is off to the point that I can’t even completely correct it, the pictures are grainy and weird at full resolution, and the batteries have less charge than that balloon I rubbed in my hair last week. The included camera protective case seems to be prone to rust. However, they are actually waterproof, which gives them a pass in my book.
To sum up the above summation: They ain’t great. They pass. That’s the most I’m going to give them, and I’m being generous.
I learned an important lesson, however, one that has stuck with me to this very day; Don’t skimp on the price; you’ll just end up with a slightly less expensive object that doesn’t work properly.
Goodbye 3.2- no,wait! I’m still going to use you. Get back here so I can kill you properly!
Standout 3D Photo

Pros: Waterproof. 3D. That means they’re the top ranking of my three 3D waterproof cameras.
Cons: Battery life, images are yellowish, poorer quality images, buttons hard to press, prone to rust.
Installing: 100% Complete. Finalizing…
Finally! I was running out of things to say! in fact, I ran out of things to say halfway through 2.1. Okay, initializing… Hang on a minute…

Section 3: Introducing Camera(v4.0):
Base Camera Model: 2x Kolari Pocket cameras.
So, with ‘Workhorse’ approaching the end of its working life, what next? How about a Kolari Pocket, which is a batch modified Canon ELPH70 camera. They look promising; 8x optical zoom, similar menus and software to ‘Workhorse’, and a fairly quick response time for taking photos.
In all, as expected with a half-decade newer camera, the pixel resolution is higher than ‘workhorse’, but they’re a downgrade in every other metric, and seem slightly worse in low light. Advances in electronics might mean that the processor is faster, but I don’t know how I would tell that, and I don’t know what difference it would make.
However, and this is a big ‘however’…
THEY’RE FULL SPECTRUM!
Up to now, I’ve mostly had a single full spectrum camera, my modified Canon T3i, so have been limited to still objects. On a few occasions, I’ve paired it with my older full spectrum camera, a Panasonic Lumix point and shoot. That wasn’t ideal; each camera responds to infrared filters differently, so the photos look different, and they’re different resolutions, so there is a lot of work on the computer to align the 3D images. I haven’t been able to use my old full spectrum camera for a while, because of [camera kill count: 7]. These new cameras shouldn’t have that ‘synchromizing’ problem; they’re both the same model, with the same modifications and the same filters.
Now, I say they’re full spectrum, but it seems from reading the information that they aren’t going to be UV-capable. Not a big problem; a lot of cameras aren’t, and my first full spectrum camera wasn’t. And UV is, honestly, a waste of megabytes most times anyways. I’m not going to gt rid of my UV-capable T3i, but now I find I can have it set as a good ‘main’ camera for visible photos with the option of using it for UV, and the Kolari setup for 3D visible and 3D infrared. They are full spectrum, so need additional lenses to change to a specific wavelength. Right now, I have three lenses for each camera; they are all Kolari brand. To show them off in good ol’ 2D, they are:


Of course, this means that I currently have four options for different spectra. After all, it is a full spectrum camera. Without a filter:
That’s just the options for now. I fully plan to add new filters as I go along. Honestly, you probably won’t see a lot of this camera on this blog for a while; it’s not like I post photos in chronological order. I post them based on whatever I feel like writing about, and I’ve still got a backlog of old 3D photos to post. As I won’t be doing any traveling for a while, I’ll probably be a few months before I start posting pictures from these cameras.
So Hello 4.0! I look forwards to working with you. Here’s to a long and happy partnership! [camera kill count on standby…]
Standout 3D Photo

Pros/Cons: I don’t know. I just got it. It’s going to be fun finding out! New year, new decade, new camera. Lets go!
UPDATE Complete: Errors in Installation: 0. Total camera kill count: 8 because there’s one I didn’t mention above. Thank you for your patience… Returning you to your blog in progress…
but second-degree burns are painful, as I now know. I doubt that the moose will come back into town soon, but at least the camera survived, and will be useful as mitigating circumstances during my forthcoming sentencing hearing. And my results? Is fire hot? Well, Like Galileo, Shen Kuo, and Einstein, that answer has confounded me. You’ll have to judge for yourself.
